The Statistics screen has three views, accessed through the tabs at the top of the page: Community, Assignments and Segments. Each one presents indicators and a table that help you track participants' progress from a different perspective.
In all views, the indicators at the top summarize the overall situation, while the table below details the information by participant, assignment or segment.
Community
The Community view shows an overview of the participants and the progress of each one across all assignments.

Indicators
Invited via registration link: Number of people who joined the community through the registration link.
Invited via batch import: Number of people invited by importing a list. Clicking the arrow takes you to the invited participants tab on the Participants screen.
Participants: Total number of people who completed registration in the community, including active and inactive ones. Pending invitations are not included. Clicking the arrow takes you to the registered participants tab on the Participants screen.
Active participants: Participants whose access to the community is currently enabled. Inactive participants had their access manually disabled by an administrator.
Community table
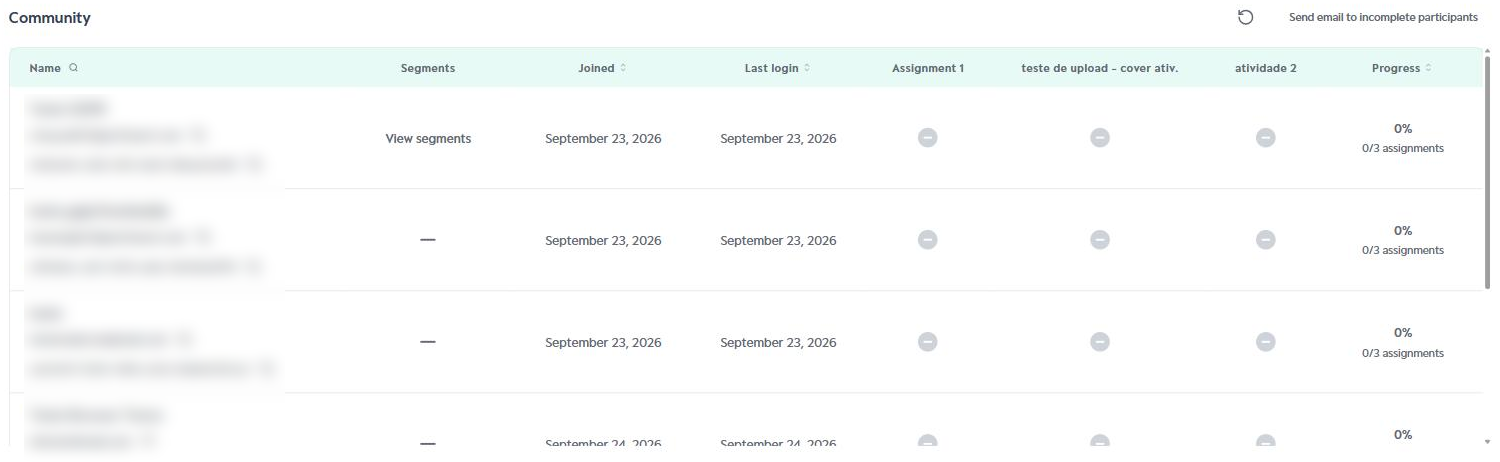
Name: Participant's name, email and ID. The buttons next to them let you copy the email and the ID, and the magnifying glass icon lets you search for a participant by name.
Segments: Clicking View segments shows which segments the participant belongs to.
Joined: Date the participant joined the community.
Last login: Date of the participant's most recent login.
Assignment columns: Each assignment in the community has a column showing the participant's status: green icon for Completed and gray icon for Not started.
Progress: Percentage of assignments completed by the participant, for example, 67% (2/3 assignments).
The Joined, Last login and Progress columns can be sorted.
Assignments
The Assignments view shows the progress of each assignment in the community.
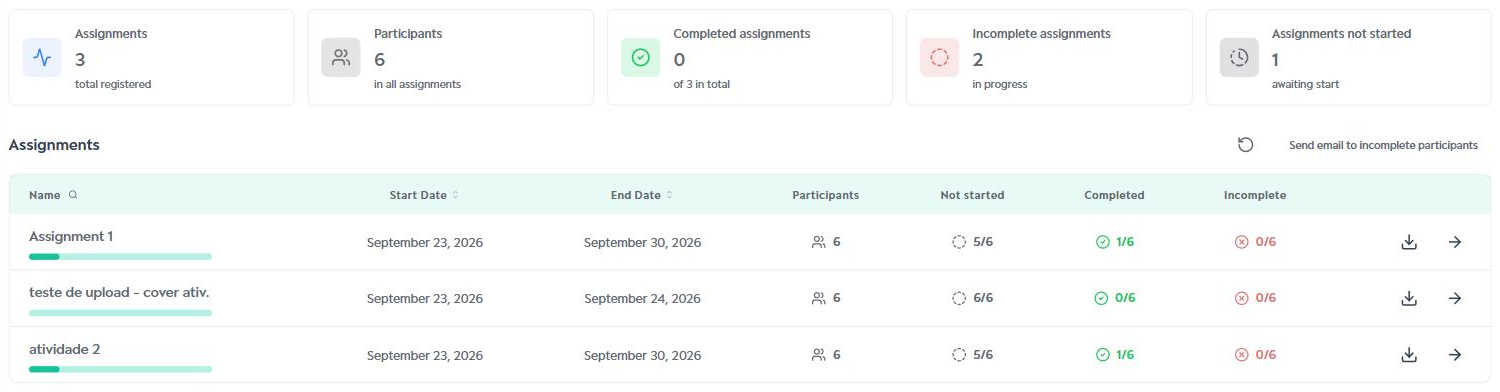
Indicators
Assignments: Total number of assignments registered in the community.
Participants: Total number of participants across all assignments.
Completed assignments: Number of finished assignments out of the total.
Incomplete assignments: Number of assignments in progress.
Assignments not started: Number of assignments awaiting start.
Assignments table
For each assignment, the table shows the Name (with a progress bar), the Start Date, the End Date, the number of Participants and how many of them are Not started, Completed and Incomplete. The date columns can be sorted and the magnifying glass icon lets you search for an assignment by name.
Each assignment also has two actions:
Download statistics (download icon): Downloads the assignment's progress data.
View details (arrow icon): Opens a window with the assignment summary and each participant's status per task.
Assignment details
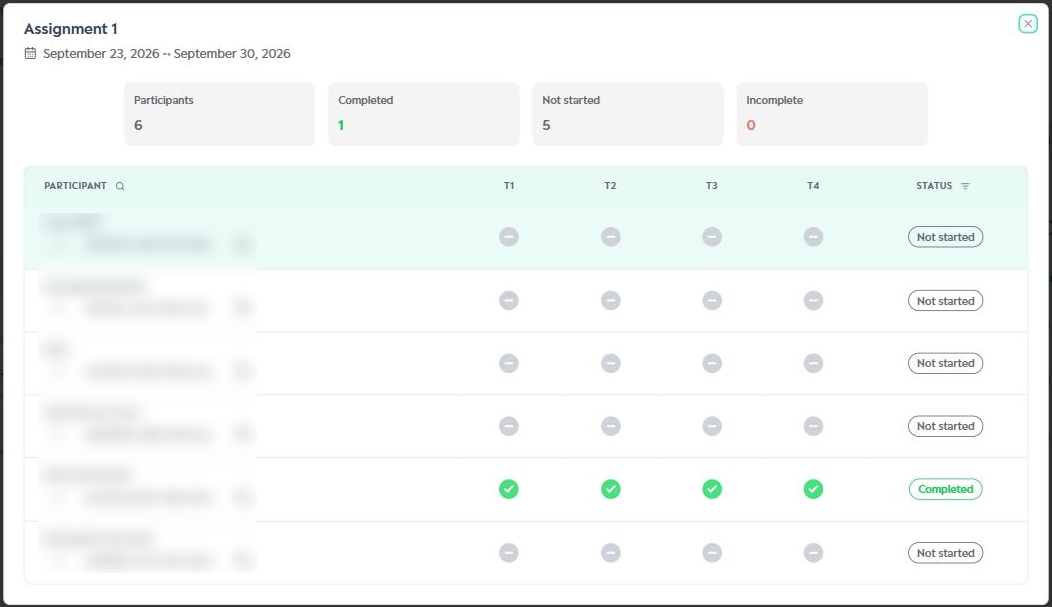
In the details window, you will find the assignment period, the totals of Participants, Completed, Not started and Incomplete, and a table with each participant's status in each task (T1, T2, T3...). You can also search for a participant by name and filter the list using the Status column.
Segments
The Segments view shows the progress of participants grouped by segment.

Indicators
Segments: Total number of segments registered in the community.
Segmented Participants: Number of participants who belong to at least one segment.
Incomplete: Segmented participants with assignments in progress.
Not Started: Segmented participants who have not started their assignments yet.
Segments table
For each segment, the table shows the Name, the number of Participants and how many of them are Completed, Incomplete and Not started. You can search for a segment by name and sort the columns.
Send email to incomplete participants
In the Community and Assignments views, the Send email to incomplete participants button lets you send a reminder to participants who have not started or have not completed their assignments.
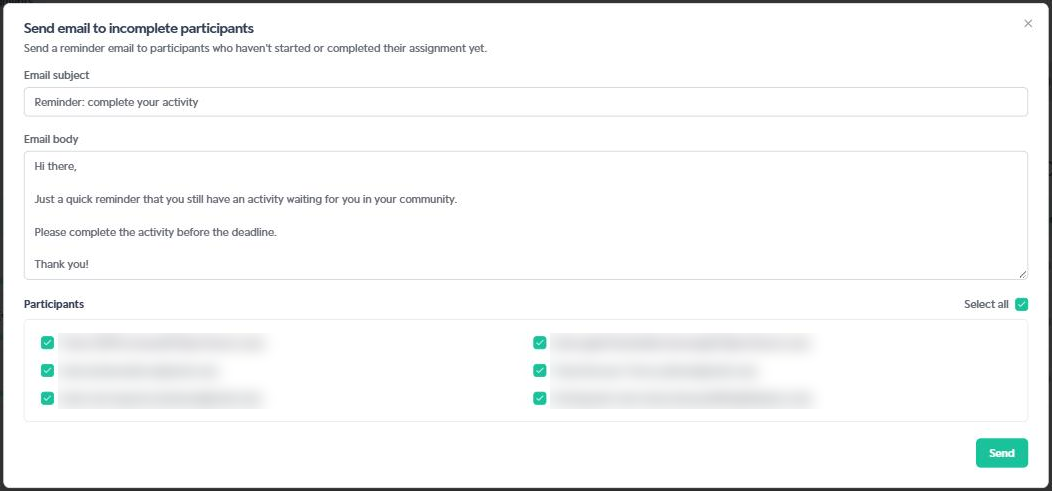
When you click the button, a confirmation window opens where you can:
Email subject: Edit the subject of the message.
Email body: Edit the reminder text.
Participants: Select specific participants who will receive the email or check Select all.
To send it, click the Send button.
Important tip:
Use the refresh data button, next to the title of each table, to reload the information without leaving the screen.
Was this article helpful?
That’s Great!
Thank you for your feedback
Sorry! We couldn't be helpful
Thank you for your feedback
Feedback sent
We appreciate your effort and will try to fix the article